Do you have a domain name with FastWebHost or any other hosting provider? Then, this guide will show you how to setup Zoho Mail with cPanel web hosting for your domain.
Let's start from basics of Zoho Mail.
What is Zoho Mail?
Zoho Mail helps small businesses and enterprises to set up, create and use their own domain name based email addresses for business communications.
The features in Zoho Mail match the requirements of organizations of diverse nature and varied organization sizes. The entire process of Email Hosting is simple and you can create a domain-based email address for all the employees of the organization with no down time.
Let’s see how you can integrate FastWebHost hosted domains with Zoho Email.
Once you have a domain, and it's managed by FastWebHost DNS, you are ready to proceed!
Zoho Mail Suite - Custom email for your domain
The steps to migrate your Email Hosting from FastWebHost or any web host to Zoho Mail is outlined below:
Step 1: Signup with Zoho Email
Step 2: Add Domain and Verification in Zoho
Step 3: Configure the MX records of your domain to point to Zoho Mail Servers, to start receiving emails to your domain accounts in Zoho.
Step 4: Add users and Create Email Accounts
Step 5: Zoho Email User access and start receiving emails
Let's dig into steps.
Step 1:
Sign up with Zoho Email
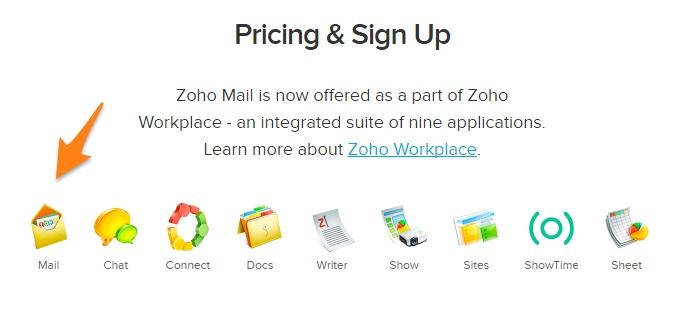
If you want to use Zoho Mail, you have to sign up with them from here: Signup, Zoho Mail is now offered as a part of Zoho Workplace, an integrated suite of nine applications including Zoho Docs, Connect and Office Suite.
Before sign up with Zoho Business Email, check their pricing and choose plan based on your business requirements. You can even try their free plan, test it and then upgrade later. The below image shows their latest pricing on email services.
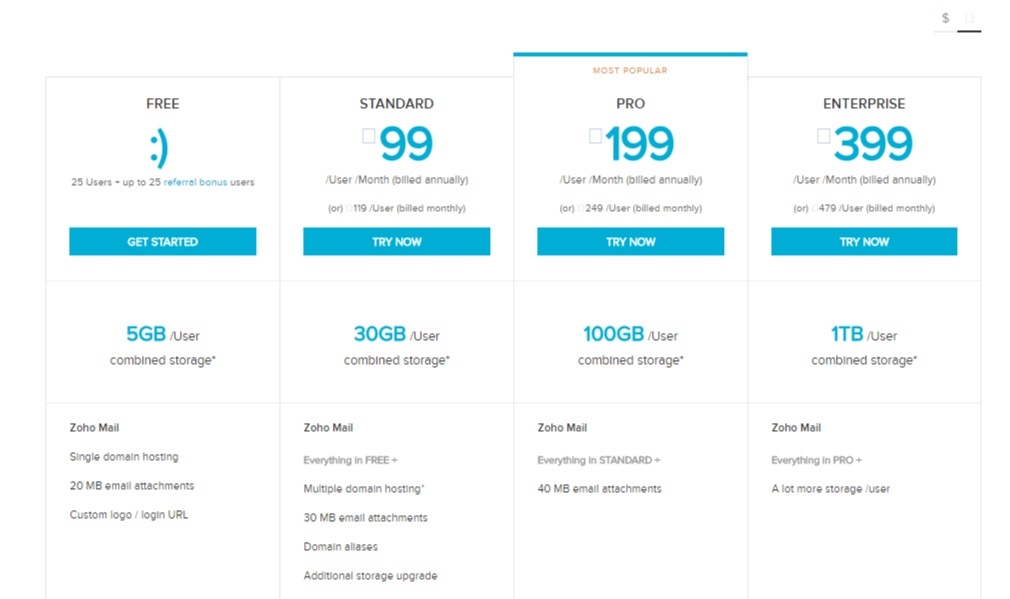
Once you select plan, click Get Started button to proceed to Signup page. For this guide, we will select the Free plan, which is free and provides up to 25 mailboxes. If you have the need for more than 25 mailboxes, or if you need more storage, feel free to select one of the priced plans.
That’s awesome deal from Zoho, Isn’t it?
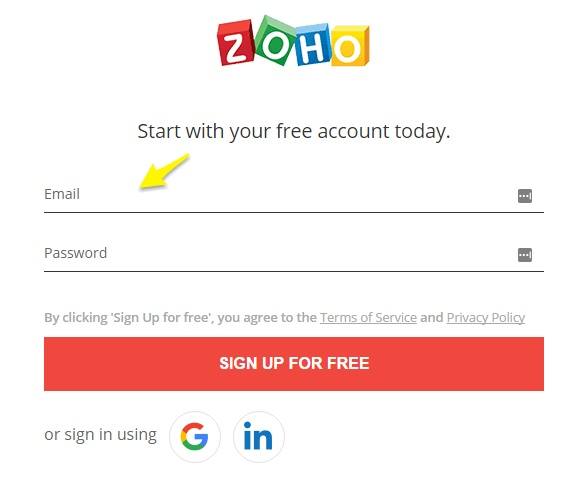
On signup page, you may register with Zoho using an external email address or with a variety of providers, such as Google Apps, LinkedIn, etc.
Finish all the signup requirements like mobile phone verification and etc. Then you will be headed towards managing your account through control panel offered by Zoho.
By using zoho control panel administrators can easily control domains, individual user mailbox quota and privileges, email policies, group email accounts and other such aspects from within this centralized control center.
In fact, the control panel interface is so intuitive and granular that even an average computer user can comfortably take charge of email administration activities.
Step 2:
Add Domain and Verification in Zoho
In this step, you'll need to add and verify the domain you want to set up the email hosting for. The verification process is required to ensure that you have Administrator privileges for the domain and are entitled to set up and use the domain with Zoho services.
If you have registered your domain through FastWebHost, then you have to use below steps.
Verify Your Domain
Zoho provides three different ways to verify the ownership of your domain. We will use the CNAME Method which involves creating a specific CNAME record in your domain's DNS record.
At this point, you should be at the Domain Setup screen on the Zoho site, which should look something like this:
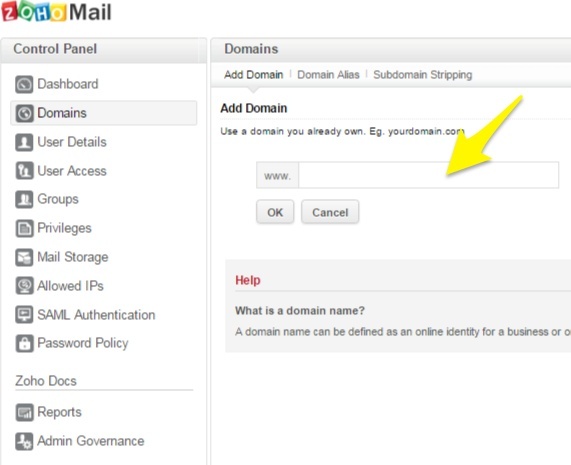
Enter your domain name in Add domain field. For Example: fastwebtech.net
After giving your domain name, your domain will be added and will see successful message.
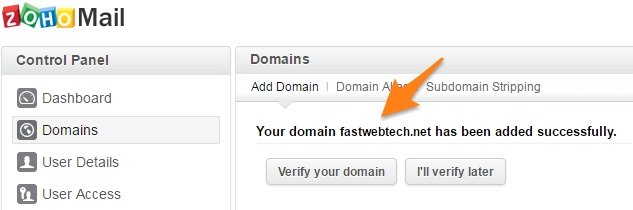
Next, click on verify your domain button to proceed further for verification. You may see verification screen like below image.
Please pay attention to the domain name information there. Also, choose cPanel in the DNS Hosting Provider list because you have been using FastWebHost as your hosting provider.
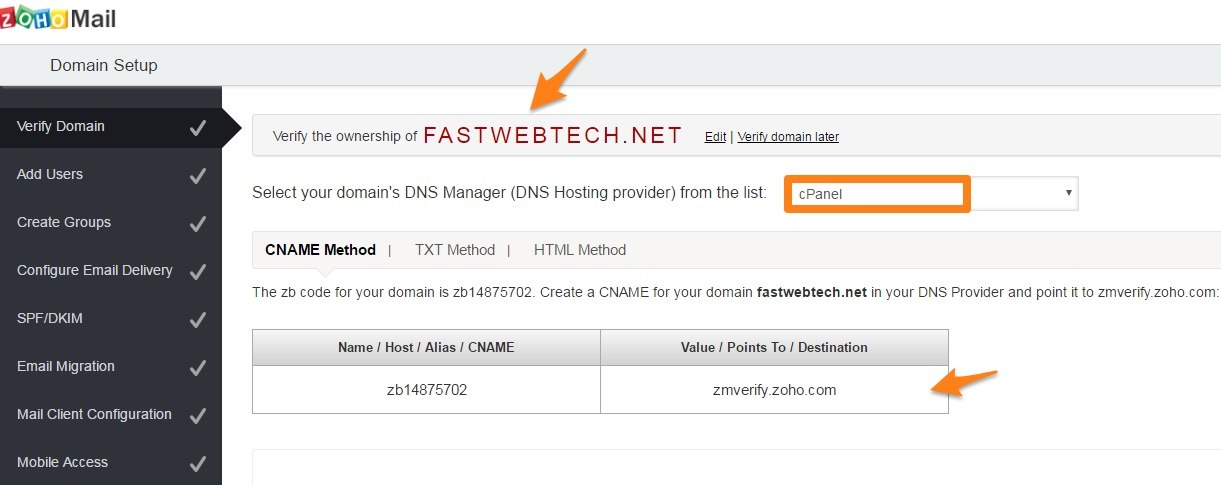
Zoho generates CNAME record for you and then you need to setup CNAME and verify later.
Let’s see how to setup Zoho mail CNAME record on your domain from cPanel control panel.
Dive into next step.
cPanel - Add CNAME Records for Verification
If your domain's DNS is hosted with cPanel follow the below steps to add CNAME and verify the domain.
Login to your cPanel Account
Locate the option 'DNS Editor' under Domains to add the CNAME.

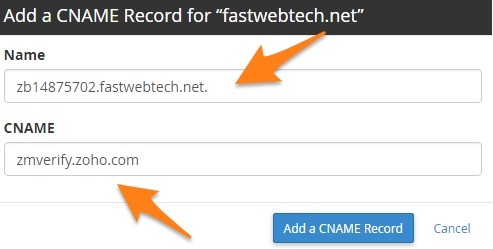
You will be redirected to DNS Zone Editor page. Find your domain name and click “CNAME Record” button to quickly add CNAME record provided by Zoho.
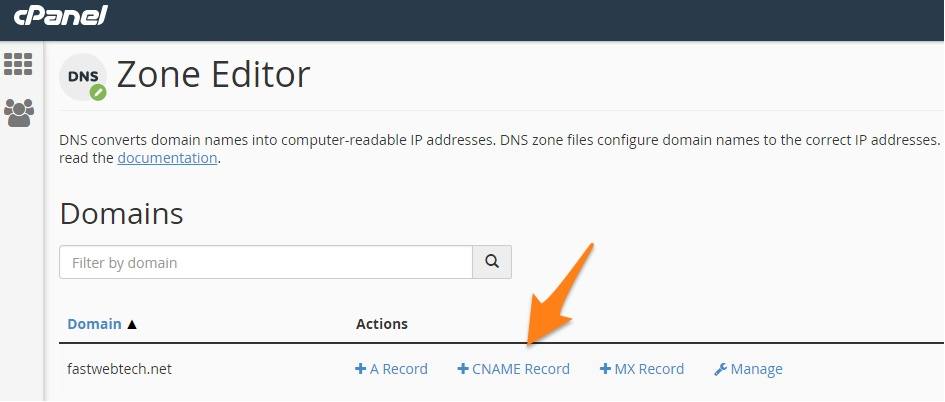
Enter CNAME record details in the pop up window.
In the Name section provide the zbcode provided to you.
In the CNAME section provide 'zmverify.zoho.com'
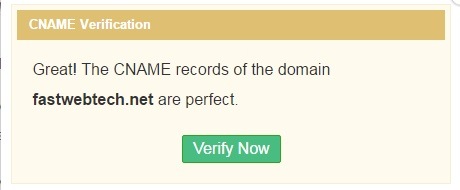
Once saved, you have added CNAME in your DNS Manager. However, you may have to wait for atleast an hour (or based on the TTL) for the changes to be effected in the DNS servers.
You may verify this by typing in zb******.<yourdomain>.com in the URL bar. This will be redirected to the Zoho login page. This ensures that you have added the CNAME records correctly.
After this, you can login to the Zoho Mail account and click 'Verify' to verify the domain.
Zoho will give you error message like below if something wrong with CNAME or DNS. In that case, you can choose other methods of Domain Verification like try by TXT or try by HTML.
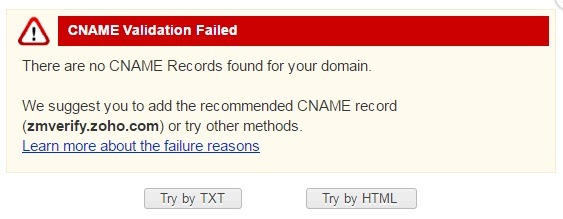
In case you have difficulty in adding CNAME, contact FastWebHost support to get assistance to add the CNAME for your domain.
Step 3:
Configure the MX Records of your domain to receive emails: cPanel
Now you must add the Zoho MX records to your Domain's DNS record to receive emails.
If your domain's DNS is hosted with cPanel Web Hosting, update the MX records of the domain based on the following instructions.
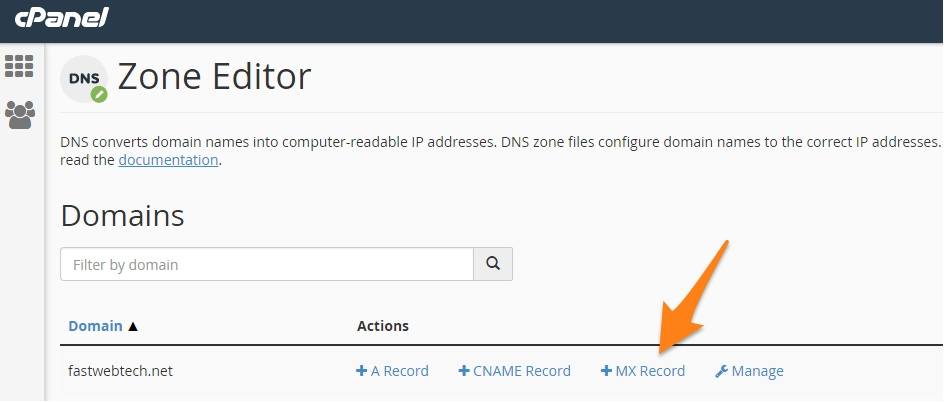
- Login to your cPanel Account.
- Locate the option 'DNS Editor' under the domains section or 'MX entry' under Mail section.
- In the MX Entry section, make sure that the correct Domain name is selected in the list.
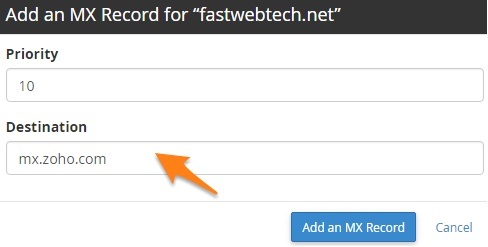
- In the Add New Record section, type the priority as 10 and destination as mx.zoho.com.
- Click Add New Record to add the first entry.
- For the second record, type in 20 as priority and mx2.zoho.com.
- Click Add New Record to add the second entry.
When you click on Manage on DNS Editor section, you can see all the MX records of your domain name. Delete all MX records except Zoho related.
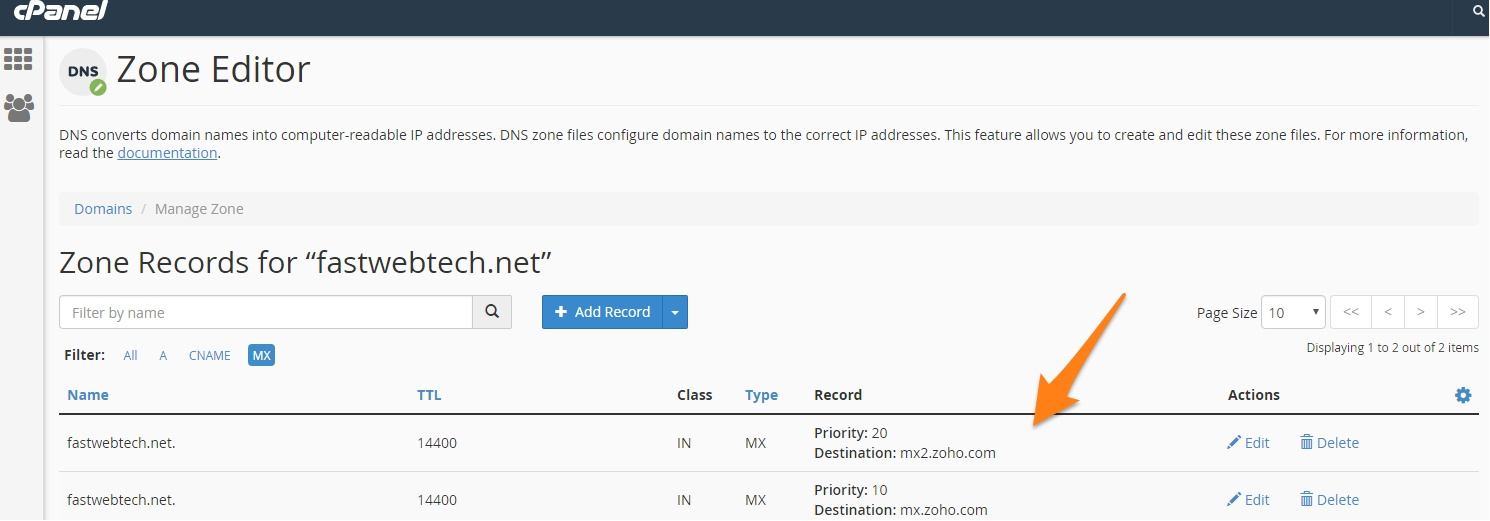
If there are any additional entries returned in addition to Zoho Mail provided records, you may not receive emails in Zoho Mail.
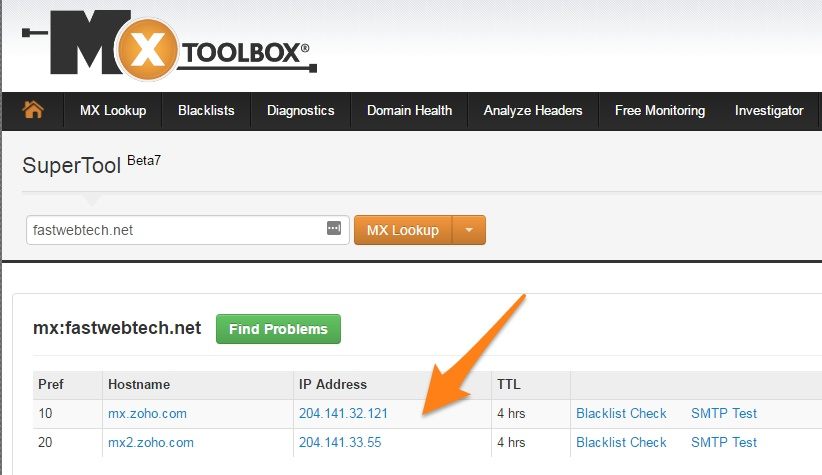
Once saved, you have added the MX records in your cPanel DNS. You can check the propagation of MX records using the third party tool www.mxtoolbox.com
When you provide the domain name in the tool, the MX records of Zoho Mail should be returned as the result.
In case you have difficulties adding the MX entries, you can get the assistance of FastWebHost support, to update the MX records of your domain.
Finally, your Zoho mail with a custom domain setup is now complete!
You may proceed with the remaining steps that Zoho provides to perform email migration or set up mobile access.
Step 4:
Add Zoho email accounts or users, groups.
After your domain is verified, add or import users and create their mail accounts. Set up groups for common accounts that are used by more than one user.
Once your domain has been verified, you can set up user mail accounts by clicking 'Add users' or 'Import users' from the Control Panel.
You can choose to add users one at a time by email address or use the bulk upload feature to import up to 200 users at a time with a .csv file.
Enable Email Hosting for Domain
Once your domain has been verified using either the CNAME/ TXT or HTML methods, the email hosting for the domain will be enabled automatically. You can enable or disable email hosting for a domain by clicking the Mail icon for that domain in the domains page.
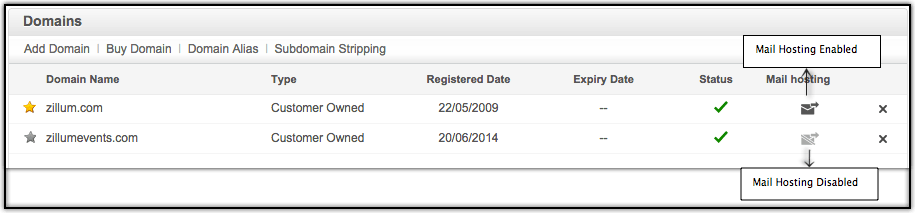
If mail hosting for a domain is enabled, an account will only be created for the user when you add them. If mail hosting is disabled, the user will be created without a domain-based mail account.
When you disable a domain's email hosting, all aliases based on that domain will be deleted.
Add User Details
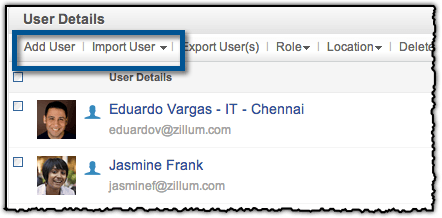
- Log in to www.zoho.com/mail as an Admin or Super Admin
- Click Control Panel, then select User Details
- Click Add User from the upper portion of the page
- Enter the user's first name, last name and username in the appropriate text box, then select a domain from the dropdown menu.
- Provide a password for the user (8 characters minimum). Make sure the user receives this password, as they will need it to log in to their account.
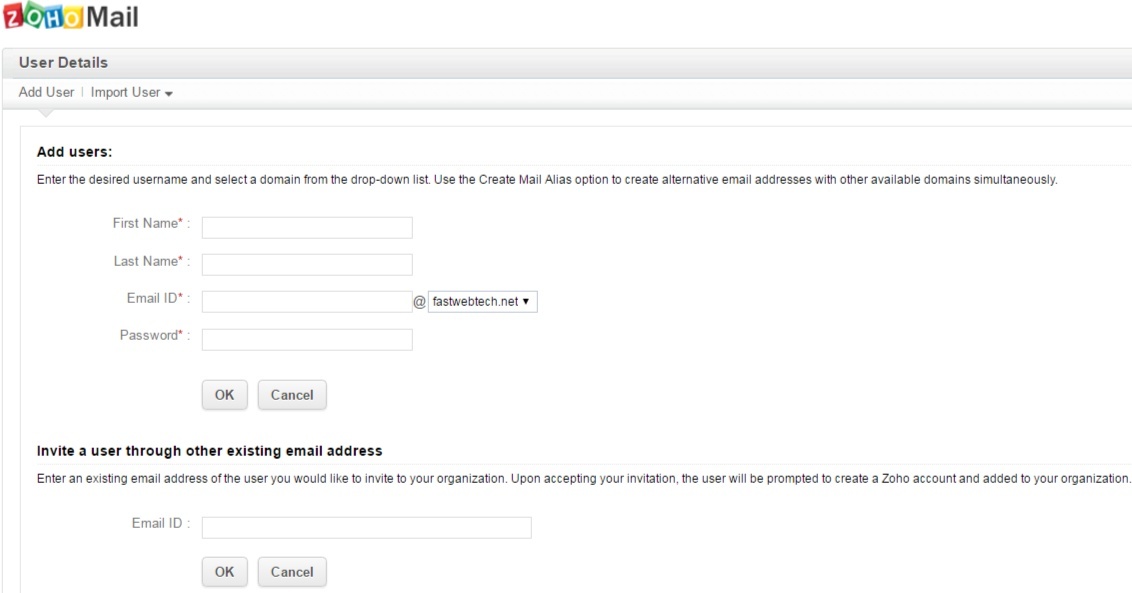
Click Ok, and the user will be created.
Note:
When you create a user, they will be able to login to their account and send emails immediately. However, they will not receive any emails until the domain's MX entries are pointed to the Zoho Mail servers.
The domain's MX Records can be cross-verified at www.mxtoolbox.com, a third-party tool that is used to check the domain's DNS records.
Zoho Mail User Login
Once you have created the user accounts, send them their login information and have them test their accounts to make sure they're set up properly.
User Login Instructions
- From your web browser, go to www.zoho.com/mail
- Provide your username (e.g.,user@yourdomain.com)
- Provide your password and click log in
Now you can access your account and emails. You can send emails right away, but to receive them your account must be configured for email delivery.
Conclusion
In our experience, Zoho Mail is a great tool for your business email communications. We are sure that above guide will be helpful to setup zoho mail on your domain.
Also, Zoho Mail competes with Gmail, Office 365 (Microsoft mail service) and other cloud based email providers.
When you factor in cost per email account, performance and features, zoho mail is the clear winner. You can count on our advise and try out Zoho Mail now!
If you find this guide useful, please leave as message in the comment box below.
Happy Emailing!